Posted on Leave a comment

Wine Bottle Cozy

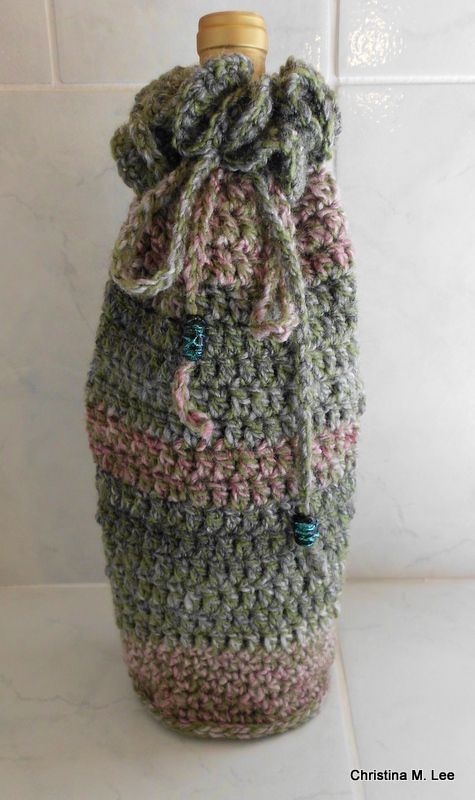
Here is the wine bottle cozy I crocheted for my Mother-in-Law for her birthday.  She loved it.

The Yarn was Red Heart Collage and the color is Landscape Green.

I just love how the greens and pink of the yarn were blended and came out so pretty.

I added the ruffled rows around the top to make it more ruffly after the draw string is pulled.

The two beads on the draw string are two of my lampwork (handmade) glass beads.


Here is the pattern I used: http://www.yarntomato.com/patterns/wine-bottle-cozy/

I made a few changes. I skipped rows 12 and 13, (the two rows where you add the beads) because I was not adding beads.  I did 6 rows of sc after changing from the bottle bottom and starting up the sides, but that was going too slow, so I changed to dc and crocheted to 9 inches from bottom.  Then switched back to sc for the last 1/2 inch.  For the top edge, after I finished the pattern, I wanted it more ruffly than the pattern called for, so I did one row of sc working 3 sc in each stitch to force it to ruffle and then another row of sc working 2 sc in each stitch, continuing to force it to ruffle.

Then made my draw string and added two of my handmade (lampwork) beads to the ends of the drawstring after I threaded it into the cozy.

Happy crocheting.

To follow my blog, click on the purple diamond on the right hand side of the screen below the links section–>

Posted on Leave a comment

Black and Red Boa

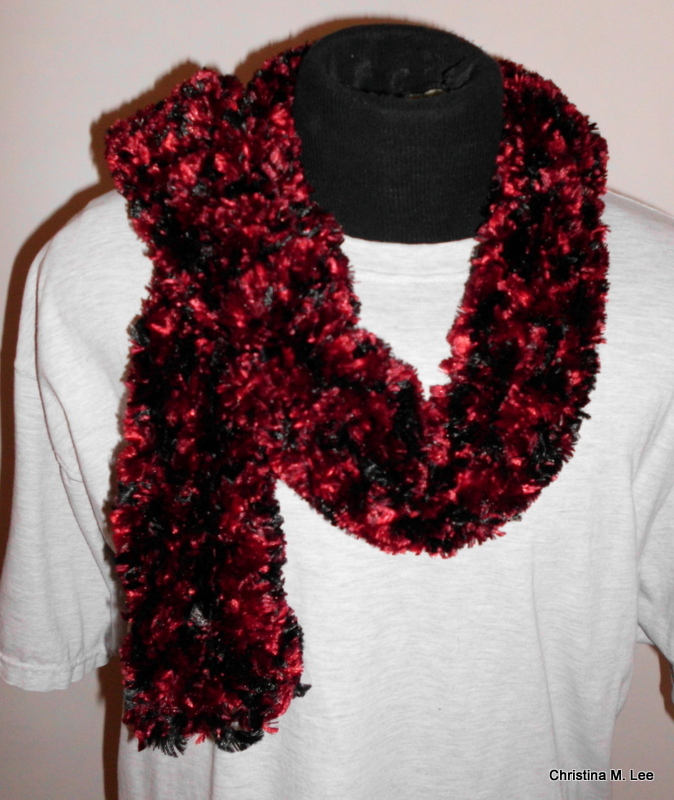
Fresh off the loom.  The loom knitted boa/scarf in Red and black.

I made this boa from fun Fun Fir yarn. It is so very soft and fluffy. You will just love it. A must have.

All my fiber arts are made in a pet free, smoke free environment.

Boa is approximately 62 inches long, hangs slightly longer than waist length

Close up of fun fir yarn

For Sale in my Etsy Shop $25.00.  To purchase click here: https://www.etsy.com/listing/123368695/red-and-black-boascarf

PLEASE NOTE: I can make you a fun fir boa for you in any color under the rainbow. Message me if you would like one, and what color you would like. Please allow several days for me to create it.


To follow my blog, please click on the purple diamond on the right hand side of the screen under the links section of the page. —>

Posted on Leave a comment

Freeform Crochet, My Scarf, Part 2

Continuing on with my Freeform scarf made with the scrumbling technique.  (See previous post for part 1) Quite interesting fibre arts, to say the least.

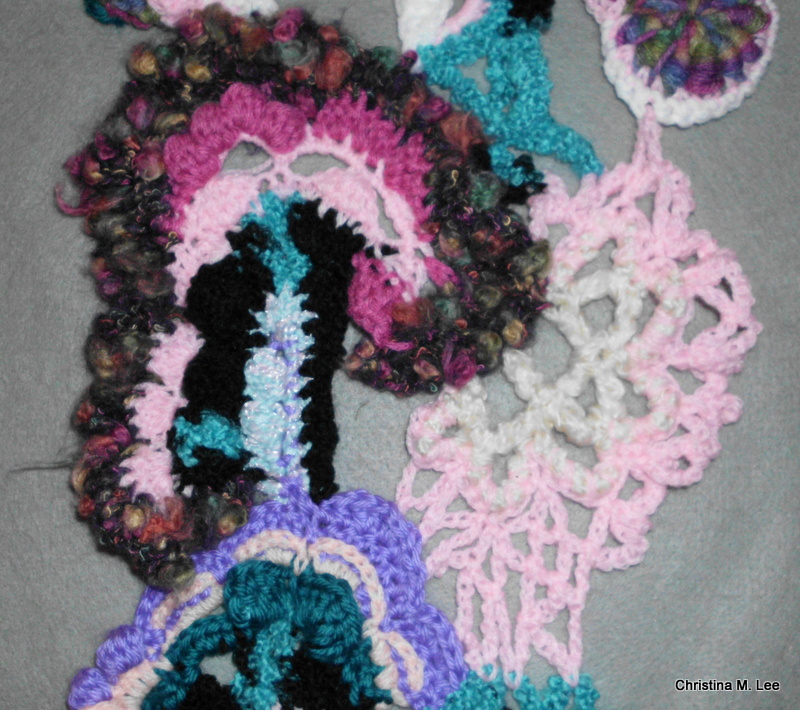
The pic above depicts my scrumbles numbers 4 and 5.  (Pics of #’s 1, 2 and 3 in previous post). Number 4 is the one on the left.  I attached the pink and started kind of at the center top of the previous scrumble.  From there I went to the blue and black yarn, then to the left of that add the teal, then the peach and lastly the purple.  Creating a half arch coming up and off of the previous scrumble containing bobbles, fans, ruffles and open spaces.

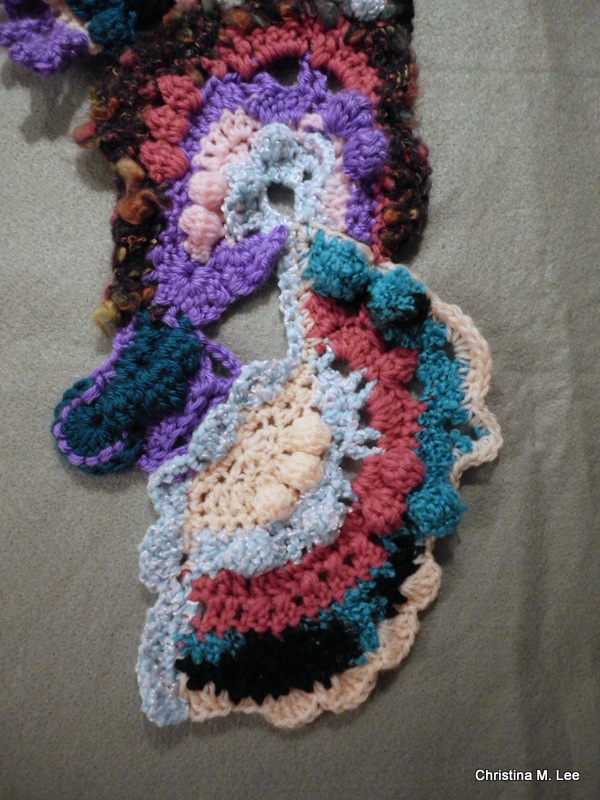
Scrumble number 5 came about as the scarf was now needing support so it would hang better.  I started on the right hand side of Scrumble #3 with the pastel blue/pink/white yarn, then to a darker pink, and then the blue/back textured yarn, it contains bobbles and shell scollops.  Then I left a lot of open spaces and created a ruffly effect in the blue/black yarn at the top, which is created with ch sts and sl sts.  It connected to #4 at the top left, attaching it to the purple.

Scrumble number 6 is the left hand scrumble in the pic above.  For #6, I again started on the left/top side with the purple and this one went straight up for a bit, then it started curving over to the left and then curved way over and back to the right.  It is mostly bobbles, sc, dc, and lacy open work with chs and sc, ending with the extremely textured brown/red/tan bulky yarn, which I have fallen in love with for scrumbling.

The scrumble to the right of it is actually #8, it was made after Scrumble #7 in the pic below, and it is open and lacy and I only used 2 colors in it.  It contains ch sts and sc only, then attaches to the lower and upper scrumbles with slip stitches.

Scrumble number 7 is the center top scrumble starting with the white yarn, which by the way, I have not used previously.  I crocheted a ch arch with the white and worked off of that, wrapping sc and dc around the chain to create the curve with a bit of scallops in it.  This one was worked up through the teal on the left and the blue/black textured yarn on the top right.

I then came in and added #8, (see pic above) the cream and pink lacy scrumble, which connected numbers 6 and 7 together on the right hand sides.

Scrumble #9 is the variegated round scrumble in the upper right hand corner of the pic above, outlined with pink yarn.  This is a bullion circle stitch and the first time I have incorporated it into the scarf, and then goes up to the left with some bobbles.  Below is a close up pic of Scrumble #9.

It connects numbers 7 and 8 together and allows them to hang better.

Scrumble #10 begins on the right, and contains only 2 yarns, blue/pink/white yarn and the purple yarn.  It comes across the tops of #9 and #7.  It is some double crochet shells which ruffle by going behind the with a short ch st and forcing them to ruffle up.  I then came behind them with the purple, working dc behind the shells and 3 sc in each dc and another row of 3 sc in each sc to force the ruffly effect at the top of the purple, the purple chs it’s way across and catches the teal with a sl st, then works around the teal in sc.

Here is a pic of the whole scarf so far.  It is about half done.

I have been having so much fun creating this.  I will work on it some more and create another blog post as it continues.  We will see where it goes next.

To follow my blog please click on the purple diamond on the right hand side of the screen at the bottom of the links section——>


Posted on Leave a comment

New Artform, Freeform Crochet

I have found a new Artform, at least new to me!! It is called “Freeform Crochet.”  And is very exciting and fun!!  This is definately fiber arts as I had never seen it before.  You just start crocheting and keep changing yarns and stitches and see what you can create.

Working in smaller sections called “scrumbling” you can get very creative.  I have started my first scarf.  This is a great way to use up scrap yarn. Pick a pile of yarn scraps of colors that compliment each other. 8, 10 or 15 colors.

The pic depicts my first three scrumbles. The first scrumble (bottom of the pic) started on the left side with the peach yarn.  I made a random amount of ch sts, some dc in a fan shape, and created a few bobbles. I changed to a light blue, white, pink variegated textured yarn, and continued with the fan shape, created some bobbles and some open spaces.  Changed to a dark rose color, still working in the fan shape, some sc, some dc, some smaller fan clusters, filling in the open spaces left in the row before.  Still continuing in the same vein, I changed to a bulky black and blue variegated yarn, adding some more bobbles, some open spaces, some fans.  Then I went back to the peach around the edge and worked some sc, some dc, some scallops around and came back across the beginning edge of the scrumble with the light blue, pink, white variegated.  End of first scrumble.

The second scrumble started where the first one left off, number two is the one shown in the top of the pic.  As you can see I was working with the light blue, white, pink variegated textured yarn and just started the second scrumble coming out of the first scrumble.  That one went on to pink, then to purple, then rose and then a real nice bulky, fuzzy yarn in roses, browns and tans.

The third scrumble is the small one to the left side of the pic.  I attached the teal yarn to the second scrumble and made some chains, then made a small loop in the end of the ch from 3 ch sts and sl st them together, then some sc back down the ch and the 3rd row had some bobbles and dc back to the loop I made in the ch and I filled it with dc.  Changed to the purple and made some sc, around the end of the circle I did back post sc.  As I came beside the first scrumble, I made some ch sts, and sl st it to the first scrumble and more chs and sl sts.  I attached it to the first one for more stability of my scarf when I wear it and as it hangs down.

I am loving this new Artform I have discovered!!!  Thinking of doing a wall hanging for my dinning room wall.  More blog posts to come as I create more scrumbles and the scarf comes together.  Any questions, just ask.  I am learning as I go and it is totally fun.

Happy hooking, as us crocheters say.

To follow this blog click on the purple diamond on the right hand side of the screen below the links section ———–>


Posted on Leave a comment

Black & Gold Fused Glass Sushi Plate and 2 Sauce Dishes

Just added to the website on the fused glass page:

I love glass fusing, is such a fun process.  I cutting the glass, I layer the pieces and place them into the slumping mold.  I then place them in the kiln and turn it on.  I ramp up the temp in increments of 100 degrees every 10 minutes, working my way up to 1450 degrees.  Holding it at that temp and checking every 10 minutes to see how the fusing process is coming along.  When it gets to the place I want it to be, then I start the cool down process.  The anticipation of waiting to see how the glass turns out is so much fun.  I can hardly wait until the kiln cools enough to open it.  Of course, I have to wait for it to cool completely so I do not crack the glass, so that takes 2 or 3 more hours after the kiln is turned off.  The glass starts out hard, gets soft as it slumps and fuses, then hardens again as cools.  Fascinating to say the least.

Black & Gold Fused Glass Sushi Plate and 2 Sauce Dishes


I layered the glass, in put it in the my kiln and fused it together while slumping it into the wavy plate mold.  The glass is taken to a temp of about 1450 degrees.  One plate takes about 3 1/2 hours in the kiln.  Plate is approximately 7 inches square.  The gold dichroic glass is original Wasser glass.  $72.00 for the set.

Black and Gold wavy sushi plate


Two sauce dishes


o follow this blog post look for the purple diamond on the right hand side of the page under the ‘links’ section and click on it.——–>

Posted on Leave a comment

Merry Christmas

Merry Christmas and Happy Holidays to you and your family from Christina
Rick and I would like to wish everyone a very Merry Christmas from our house and art studios to you and yours.  No matter how you celebrate the Holidays, we pray Christ’s blessings on you, and pray that the Holidays are filled with love, peace and joy for you and yours.  We also praying you have a prosperous New Year too.   Christina
Here are a few pics of the Fused Glass gifts I have been cranking out of my studio for Christmas gifts the last few weeks:
Fused Glass Clock for my Daughter, Beckie
Fused Glass Clock for my Son, Robert
Fused Glass clock for my Daughter-in-law, Stephanie
Fused Glass Sushi Plates for my Son-in-law Richard
Close up of the Frit piled edging, Richard is an Oklahoma State U fan, thus the Orange and Black.
Completed Set of 4 plates
Posted on 1 Comment

Double V Shell Scarf with Scalloped Edges, Free Crochet Pattern

Double V Shell Scarf with Scalloped Edges
11/1/2010 by Christina M. Lee

Skill Level:
Intermediate: (If using Homespun, because it is a bulky yarn and hard to crochet with, I do not recommend beginners use this yarn.)
Easy: (If using any 4 ply worst weight yarn, see suggestions below).

Gage:  Not important

Materials:
Lion Brand Homespun Yarn 2 Skeins, color of your choice
(Or for a not so bulky look use any 4 ply worsted weight (non-bulky) yarn, color of choice and a H hook.  Ideal yarns would be Vanna’s Choice, Caron Simply Soft, I Love This Yarn, Red Heart Super Saver, Red Heart Soft, or Loops and Threads.)

Crochet hook size I

Special Stitches: Double V Shell = 2 dc, ch 2, 2 dc in same space, will be referred to as dvs in pattern below.

Pattern:
Ch 23 (28 for worsted weight).
Row 1.  dvs in 4th ch from hook (see above for instructions on how to make dvs), skip 4 ch, dvs in 5th ch, repeat across.  A total of 5 (6) Double V Shells. Ch 3 turn.

Here is what the Double V Shell (dvs) stitch looks like.
For the sample pictures I used a regular 4 ply worsted weight yarn so you could see the dvs stitch.

End of Row 1

Row 2.  dvs in the top of the 2 ch space of the dvs in previous row, (in the center top of shell) repeat across. Ch 3 turn.

End of Row 2, you can now see the scalloped edges starting to form.

Rows 3-79 (or to desired length):  Repeat row 2. Ch 3 turn.  At the end of row 79 Ch 4 turn. Finished length before fringe is 80”, with fringe is 88”.

Row 80:  sc in the top of the 2 ch space of the dvs in previous row, ch 4, repeat across.  Do not fasten off.

Pretend this is row 80.  Chain 4, sl st to the in the center top of the dvs stitch and repeat across.

 Close up of chain fringe below:

Chain Fringe:  ch 35, sl st in center of 4 ch sp, repeat across.  Fasten off.  Chain Fringe at beginning of Scarf:  Attach yarn to the opposite end of the scarf, (the beginning), in the center bottom of the dvs, ch 35, sl st in to the center of 4 ch sp, repeat across.  Fasten off.  Work in ends.

Chain 35

Sl st into center top of dvs

Chain 35

Sl st into the top of the next ch 4 space, repeat across.

I hope you have fun creating your scarf. Please share pictures of your completed scarf with me, feel free to post them on my blog.  I would love to see your completed scarves.

You can also post your pictures of your finished scarves and comments about the pattern on my Facebook page, Knitting & Crochet Friends https://www.facebook.com/KnittingAndCrochetFriends?ref=ts&fref=ts.

~~~~~~~~~~~~~~~~~~~~~~~~~~~~~~~

This is an Original Design by Christina M. Lee.  Copyright Christina M Lee Designs and Christina M Lee, November 1, 2010.   Please feel free to use my pattern to make as many scarves as you desire, give them away, sell them freely.
You are prohibited from selling the pattern or claiming is as your own, or publishing it in any printed material without my explicit permission.  You are prohibited from publishing, copying, or using the photographs in any manner without my explicit permission.
I would please ask that when you share the pattern you give me credit for the pattern and post a link back to this blog page.
If you have any questions about the pattern, or need any help with the pattern, please feel free to contact me. You may email me at Christina@creationsbychristina.net  or post a comment below.

Happy Crocheting,

Christina.

Here are some other scarves I have made with this pattern:

These two were for granddaughters Allyson and KC.  Christmas Presents.

A Friend, Jessica’s scarf, a gift.

Scarf for my best friend, Linda, for her birthday.

I just love how some of the homespun yarn changes shades as you crochet.

Another shot of Linda’s scarf, the chain fringe.  I have now made 10 of these scarves for gifts.

www.christinamleedesigns.com


#freecrochetpattern #crochetscarfpattern #doublevscarfwithscollopedges #crochetpattern

Posted on Leave a comment

Classes I Teach: Silk Painting

Have you ever wanted to learn to paint on silk.  This is a very fun class. 

SILK PAINTING:  Paint on 100% silk.  In this class you will learn how to stretch your silk onto a frame for painting and how to paint on the silk.  You will learn different methods of creating designs on silk, how to heat set the dyes making them color fast, and about different resists.  $135.00, includes all supplies (silks, paints, brushes and the use of stretcher frames). This is a 3 secession class, each class secession is 5 hours long.  The class is limited to two students.  You will take home two or three completed silks.

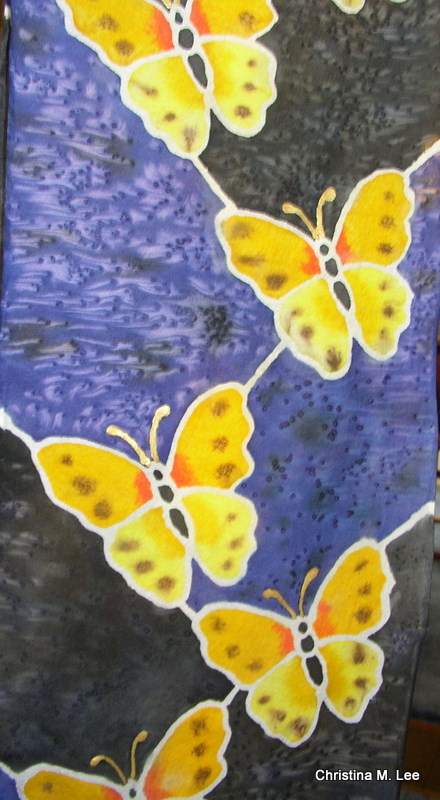
Silk Butterfly Scarf, hand painted by Christina

Silk on stretcher frame, just painted by Christina

Classes are available by appointment only:

Due to limited space available for teaching, my Classes are limited to 1, 2 or 3 students per class depending on the class.  This makes my classes very individualized providing you the one-on-one instruction that you will not receive in a larger class setting.  This also allows me to be flexible in my teaching schedule.

Classes are generally weekday evenings, or Saturday during the day or evenings.  I can also work with you to fit your class around your schedule.  I can arrange a weekday afternoon class if that is the only time you have available.  I thoroughly love teaching, so click here to see a list of other classes I teach: http://creationsbychristina.net/?page_id=913


To follow my blog, click on the purple diamond at the bottom of the links section on the right hand side of the page ———>

Posted on Leave a comment

Learn how to make glass beads

Glass bead making, under an open torch, Lampwork.

In my next few blog posts, I thought I would remind you of the classes I teach.


LAMPWORK BEAD MAKING: This class teaches you how to make your own handmade lampwork or flamework glass beads.  Glass rods are melted under an open torch and formed into glass beads.  You will learn about expansion of glass, compatible glasses, how to anneal your beads, and much more.  $100.00 includes all supplies and use of all tools (you take home your finished beads).  This is a one secession class, 5 hours long.  The class is limited to three students.

Classes are available by appointment only:

Due to limited space available for teaching, my Classes are limited to 1, 2 or 3 students per class depending on the class.  This makes my classes very individualized providing you the one-on-one instruction that you will not receive in a larger class setting.  This also allows me to be flexible in my teaching schedule.

Classes are generally weekday evenings, or Saturday during the day or evenings.  I can also work with you to fit your class around your schedule.  I can arrange a weekday afternoon class if that is the only time you have available.  I thoroughly love teaching, so click here to see a list of other classes I teach: http://creationsbychristina.net/?page_id=913


To follow my blog, click on the purple diamond at the bottom of the links section on the right hand side of the page ———>


Posted on Leave a comment

Art on The Water Last Saturday

Here are some pics of last Saturday’s Show, Art on the Water,

Jackson’s Bistro, Tampa, September 15, 2012.

It was an awesome art show. The next Art on the Water is Scheduled for November.

Date to be announced soon.  I am already signed up for the same spot.

My tent setup and my Jewelry and Silks

Other vendors displays at Art on the Water

To follow my blog, click on the purple diamond on the right hand side of the screen below the links section.——>

Posted on 2 Comments

Creating new Necklaces

Creating new Necklaces for the up coming Art on the Water show

I just thought you might like to see what I am working on.  Here is my work bench and the some of the stuff just finished and some in the process, preparing for this coming Saturday’s show.  (See my previous post for Art on the Water show info.)

Two finished necklaces in the fore ground of the picture.  The cross on the left I did a few weeks ago, the dangle one on the right, I just finished Mon night.  On the bead board is the next one I started laying out last night and stringing.  It will be multi-strand. 

The next step in the process is to price each finished piece and to photograph them.  I so love being creative.  I love making wearable Art, and I hope you enjoy wearing it as much as I enjoy creating it for you. 

I wish I could do this full time.  One day soon I will retire from the paralegal gig and just have fun creating full time.  Have a happy Tuesday everyone.  Do come see me at Art on the Water this Saturday, Jackson’s Bistro, Tampa, Florida.  (See previous blog post or Events page for more info.)

To follow my blog, click on the purple diamond on the right hand side of the screen below the links section.——>

Posted on Leave a comment

First Show of the Season

I am starting the new show season for 2012/2013 and you don’t want to miss my first show of the season.  Winter is our art season down here in Florida, unlike many other states where spring and summer are the season.  Our summers are too hot, but fall, winter and spring are just right for doing art shows and festivals. 

My very first show will be this next weekend:

I will be on the waterfront at Jackson’s Bistro, Harbor Island, Tampa Florida,  Saturday September 16, 2012, 11 am to 6 pm.  I am excited as this looks to be a fantastic show.  I love doing shows by the water. 

I will be in the studio creating all weekend and every evening this week getting ready for the show.  I am promising to create new rings, earrings, bracelets and much more.  I will post pics as I create.

If you are in the Tampa Florida area please come out and see me.  I would love to meet you.  Come by my tent and say hi. Start your Christmas shopping early and get a unique, one-of-a-kind piece of “Art You Can Wear” for that special someone.  Hope to see you next week.

Follow my blog by clicking the purple diamond on the right hand side of the page.———–>

Posted on Leave a comment

Nice article written about our arts.

In this blog I want to link you the the Mazon monthly newsletter where they have written a wonderful article about myself and my Husband, Rick, and our artwork. 

Thank you Linda Burson for a great article.

To read the article click this link:

http://myemail.constantcontact.com/Mazon-s-September-2012-Newsletter.html?soid=1102056364185&aid=In8bzNRwz_Y

Photo: Tina did a flamework bead demo for Creative Arts Jam night....soooo interesting!!!

Photo taken by Donna Saunders

To follow my blog, click on the purple diamond on the right hand side of the screen below the links section.——>

Posted on Leave a comment

Knitting & Crochet Friends

Hello everyone. I am venturing back out into blogland, adding my Knitting & Crochet Friends group and fiber arts to my blog.  In these blog posts, I plan to share links to patterns I find on others websites and other blogs, share some patterns of my own that I am currently creating, and help you with any crochet or knitting questions you might have.  I hope you to feel free to ask for help.  Also I want you to meet Spike, whose picture you see here on this post.  Spike, the scuba diving doll (amigurumi), is our mascot for our group.  I will share more about Spike in a future post.

First let me share how this group got started.  It was May 2009 when my best friend, Linda, asked me to teach her to knit.  We were in Michaels arts and craft supply store, Linda, our husbands and myself.  We were looking at some very pretty yarns and Linda asked me, Do you know how to knit?  I told her that I did.  She asked me if I could teach her.  I told her I had not knitted in many years, but yes I could teach her.

We both decided to buy some yarn.  As we looked at all the pretty yarns, I started to pick out something I liked for myself, when my Husband, Rick, said, If your going to knit something, make me an afghan for the couch to cover up with when I take a nap.  Rick picked out a a nice variegated yarn in burgundies, browns, blues and tans, (to match the couch), and then I went home and dug out all my knitting needles from years prior and Linda and I started meeting every week.

It wasn’t long before more people wanted to learn first knitting, then crochet and by Sept 2009 we officially started a local group here in Bradenton, Florida called Knitting & Crochet Friends.  About a year later I created our Facebook page: https://www.facebook.com/KnittingAndCrochetFriends

Leading this group has been a blast for me.  I love teaching.  I had not knitted or crocheted in about 25 years and I forgot how much I love the needle arts too, along with my Jewelry Design and Silk Painting Design.

Various people have passed through the group in the past three years.  Mothers and daughters learning together, from ages 6 to 70 we have had quite the variety, some rank beginners, some intermediate, and some well accomplished needle artists.  It has been fun getting to know each one.

If you in the Bradenton, Florida area, or are in the area for a visit, please join us on Sunday nights, we would love to have you.

Here is a pic of that first knitted afghan for Rick:

This afghan was my own design.  I knitted 6 rows, with the standard knit stitch (garter stitch), then I knitted one row and purled one row, for 10 rows (sockinette stitch), and alternated that pattern to create an afghan.

Over the past 3 years, I have went on to make afghans for each of my 7 grand children, and have made hats, scarves, fingerless gloves, angels and snowflakes (more about all these in future blogs).  It has been a fun adventure and I am looking forward to many more years of teaching.  I especially love teaching young people, seeing them learn handcrafts is so rewarding.

In wrapping up this post, I will share two great places to find all kinds of patterns for free.

If you are looking to find crochet patterns this is a great place is:  www.crochetpatterncentral.com

For knitting patterns:  www.knittingpatterncenteral.com

Christina

To follow my blog, click on the purple diamond on the right hand side of the screen below the links section.——>

Posted on Leave a comment

Upcoming Blogs

In the next few weeks I will post some blogs about free form design, i.e. designing a necklace or bracelet when you have not drawn out a sketch in advance.  As in the pic below.

This is a carved bone pendant, strung abstractly with 6 of my handmade glass beads (lampwork) and various bone beads.  I dropped the beads on the bead board and let them fall where they may, then strung them. 

Most of the time I am very symmetrical in my designs, making each side of the necklace match, left and right of the focal piece in the center, whether it be a bead, a carved bone pendant or a fused glass pendant I created, but occasionally I get a little wild and just drop the beads and string them.  (My husband likes it when I do.  The necklace in the pic is one of his favorite pieces.)

Maybe you purchased some semi-precious gemstone beads or just some glass beads, and you have been looking at these beads in your bead box for quite some time trying to figure, what am I going to make with them.  How do you take them from just being a pile of beads, just sitting around the art studio, to finished jewelry?  I will do some layout on my bead board and shoot some pics and post them to give you a concept of how I get creative, whether symmetrical or abstract, how does one come up with a design. 

How do I get ideas for my designs, you ask?  I look at the seasonal color charts that are published and I look at clothing magazines and jewelry design magazines.  I get ideas from various places, nature, leaves, flowers.  I never copy anyone’s work.  All my pieces are my originals, but I can look at someone work and get a basic idea and then create my own unique piece from there.

If you have any questions, please post them.  I will try my best to answer them.

Christina


To follow my blog, click on the purple diamond on the right hand side of the screen below the links section.——>

Posted on Leave a comment

Light Defusing Photo Booth

How to make a Light Defusing Photo Booth.

Taking photos of your art work is a whole other art. Good photos will help sell your work, bad photos will turn people away from purchasing your work. Good photos will give you a better chance of being juried into art shows.

Several companies sell photo booths for very expensive prices.  As a beginning artist  purchasing an expensive booth is not an option.  So you can make a simple light defusing booth, rather inexpensively.

A plastic Rubbermaid file box with three desk lamps shining through the plastic (defused light) makes an very good light box for a very reasonable price.  Place one light on each side of the box and one above the box.   You can also place a 4th lamp behind the box if desired.  The file box cost me $10 or $12 at Wal-mart or you can probably find one at an office supply store.  The desk lamps are about $10.00 each.  I have those on my work bench already, because I like lots of light when I work.  Use a hanging file box as it is square.  Other Rubbermaid containers have rounded corners and may not work as well.

I stand the box on it’s end and set it on my work bench and put a piece of gray felt in it and place the piece of jewelry on the felt.  I turn the flash off on the camera.  Glass jewelry will have a reflective glare if not.  If the pic is a bit dark because of no flash, I can always lighten it a bit in the photo program.  (As a note, I use Picasa by Google as photo organizing and editing program.  It is free, just go to google.com and download it.)

Close up of jewelry inside the box.

Finished pic of necklace.

I usually take 8 or 10 pics, then choose the ones I like best.  I take pics of the completed necklace and a close ups of my handmade beads or fused glass focal pieces.

As an added note, a gray background is the best colored background to use.  I have tried other colors.  Black is good, only if you have a piece of artwork that is very brightly colored.  Otherwise black will just absorb your artwork and it will not show up in your photos.  White is to bright of a back ground and will detract from your artwork.  Tan is a second best color, next to gray, but can show up with a orange tent using no flash.  Through trial and error, I have discovered gray is the best background to use and a piece of felt is very inexpensive, and brings out the best of your artwork.

Close up of my handmade beads in the Necklace

Close up of 2 fused glass pendants I made, strung on Sterling Silver wire with my handmade beads and Sterling Silver beads.

Note in all of the above pics the piece of jewelry stands out very clearly on the gray background, no matter what the color, blue, green, red, black purple, gold, or teal.

Hope this article helps you take the best pics of your art work.  If you have questions about photographing your artwork feel free to ask.  Christina


Posted on Leave a comment

I am back

Well hello everyone.  I know, it has been months and months since I wrote the blog.  Sorry, life happens.  I have migrated all my websites over to my Son’s servers and that took a few months getting them all arranged again.  Then he moved my blog to my new website.  So it has taken me a while to get back to the swing of things.   If you were a follower of my blog you will have to re-follow me.

In the next few months I will be continuously adding new jewelry and hand painted silk creations to my website and I also plan to add some fiber arts creations to my line of “ELEGANT ART YOU CAN WEAR.”

You will find my jewelry and silk creations for sale here on my website on my products page.  I am constantly adding new products so check back frequently.

Thanks for being patient with me while I got re-adjusted.  I hope to start writing more blog entries about creating jewelry.    Christina

Posted on Leave a comment

Holiday Greetings

Hello everyone.  I trust you had a wonderful holiday season.  My family and I had a fantastic Christmas!!!  Haven’t done much jewelry making the last few weeks, and have not posted to the blog.  With the closing of my art gallery, getting ready to leave for vacation and being gone, there was not much time to make jewelry.  I just posted a couple of pendants to my Etsy Shop. So for today’s blog I will show you those.

This Necklace has a carved bone pendant, 2 of my handmade (lampwork) beads, and copper beads, strung on a Sterling Silver Chain.  To see more pics and find out more info click here:
http://www.etsy.com/listing/65488100/carved-bone-pendant-copper-beads-on

Blue and Red Pendant is fused glass with 4 of my handmade (lampwork) beads strung on red rubber cord.  To see more pics and find out more info click here:
http://www.etsy.com/listing/65487462/blue-red-fused-glass-pendant?ref=v1_other_2

Coming soon, I will post a blog on making fusing glass pendants.  I will also be entering some pieces in the Manatee County Fair and will keep everyone apprised on that project.


Wishing a very prosperous New Year to everyone.
Christina

Posted on Leave a comment

After Annealing The Beads/Design

Once the beads are annealed in the kiln (see my previous posts) they are ready to incorporate into jewelry.  Thus begins the process of design.  I am constantly seeing design all around me.  I take pictures with my cell phone, or on my camera.  I grab a pen and paper and sketch out a design.  Sometimes a design comes from something I see someone else wear.  Maybe on a TV show or walking down the street.  Sometimes I find a picture in a magazine I clip out.  Sometimes designs just pop into my head, from trees or nature.  I have even dreamed designs.

I take all the sketches, photos and magazine pics that I collect, and scan them into my computer.  I save them in pdf format.  I place all ideas in a folder I call ‘sketch pad ideas.’  Then I break them down into two categories.  The first is ‘Others Ideas’ the second is ‘My Ideas’.  I sign and date all my original sketches and write notes on the sketch.  Others ideas I do not sign, but still date them and write notes on them.  That way when I start looking for ideas I will remember when and where I saw the idea.  I never steal someone’s design, but I use others ideas as a launching pad to stimulate my mind.  The collection of sketch pad ideas are just that, ideas.  A place to start.  I look at someone’s piece of jewelry and think, how can I change that and make it my own unique piece of jewelry.

Example:


The drawing above was an idea I had for a necklace for a birthday present for my Daughter, Becky in December 2005.  It was drawn on my computer in Paint program.  Since then I have a computer program called Bamboo.  (My Son’s family gave me Bamboo for Christmas in 2008.)  It is a drawing tablet that looks like a mouse pad, and the mouse looks like a fat ink pen.  You draw with the mouse/pen on the tablet just like on a sketch pad, which draws right on the computer screen.  I love the Bamboo sketch pad.

This necklace was designed around the small Topaz gems.  I purchased them then had to design a necklace that would fit the small Topaz without overpowering them.  Thus the making of the very small clear glass beads.

Below is the finished necklace which has 6 of my handmade beads.  They are small, clear, wrapped in dichrioc glass and it has 5 Mystic Topaz gems, with a Sterling Silver clasp.  Topaz is the Nov birthstone, my daughter’s birthstone.


The closeup shows the small hand made beads.  They are about 5 millimeters, and the Mystic Topaz are about 8 millimeters.  I hope this blog post gets your design juices to start flowing or at least gives you some insight into my mind and how I come up with a design for a piece of jewelry.  Christina

Posted on Leave a comment

Making Glass Beads, Part 2

After I make the beads, I put them in my kiln and fire them.  The process is called annealing.  It strengthens the glass so the bead will not crack and break.  The glass has gone through severe thermal shock in the making of the bead, starting with the glass at room temperature to the very hot flame of the torch, about 2000 degrees, then slowly cooling again back to room temperature.  Annealing them takes the glass up through all the temperature ranges slowly, allowing the glass to slowly acclimate and strengthen.  I hold the kiln at 940 degrees for 30 minutes, which is called soaking, further strengthening beads before slowing cooling the kiln down.  This process takes about 3 1/2 hours.


My kiln is an older model, I have been using it since the 1980’s when I bought it new, but I love it.  I usually spend several days making about 75 to 100 beads.  When I have enough beads to cover the kiln floor, then I anneal them all at once.

In creating a piece of jewelry I will be selling to the public, I want a finished bead that I know will endure.  I don’t want to have a bead crack in half while someone is wearing the jewelry.

Christina