Posted on Leave a comment

Black & Dichroic Fused Glass Shawl Pin

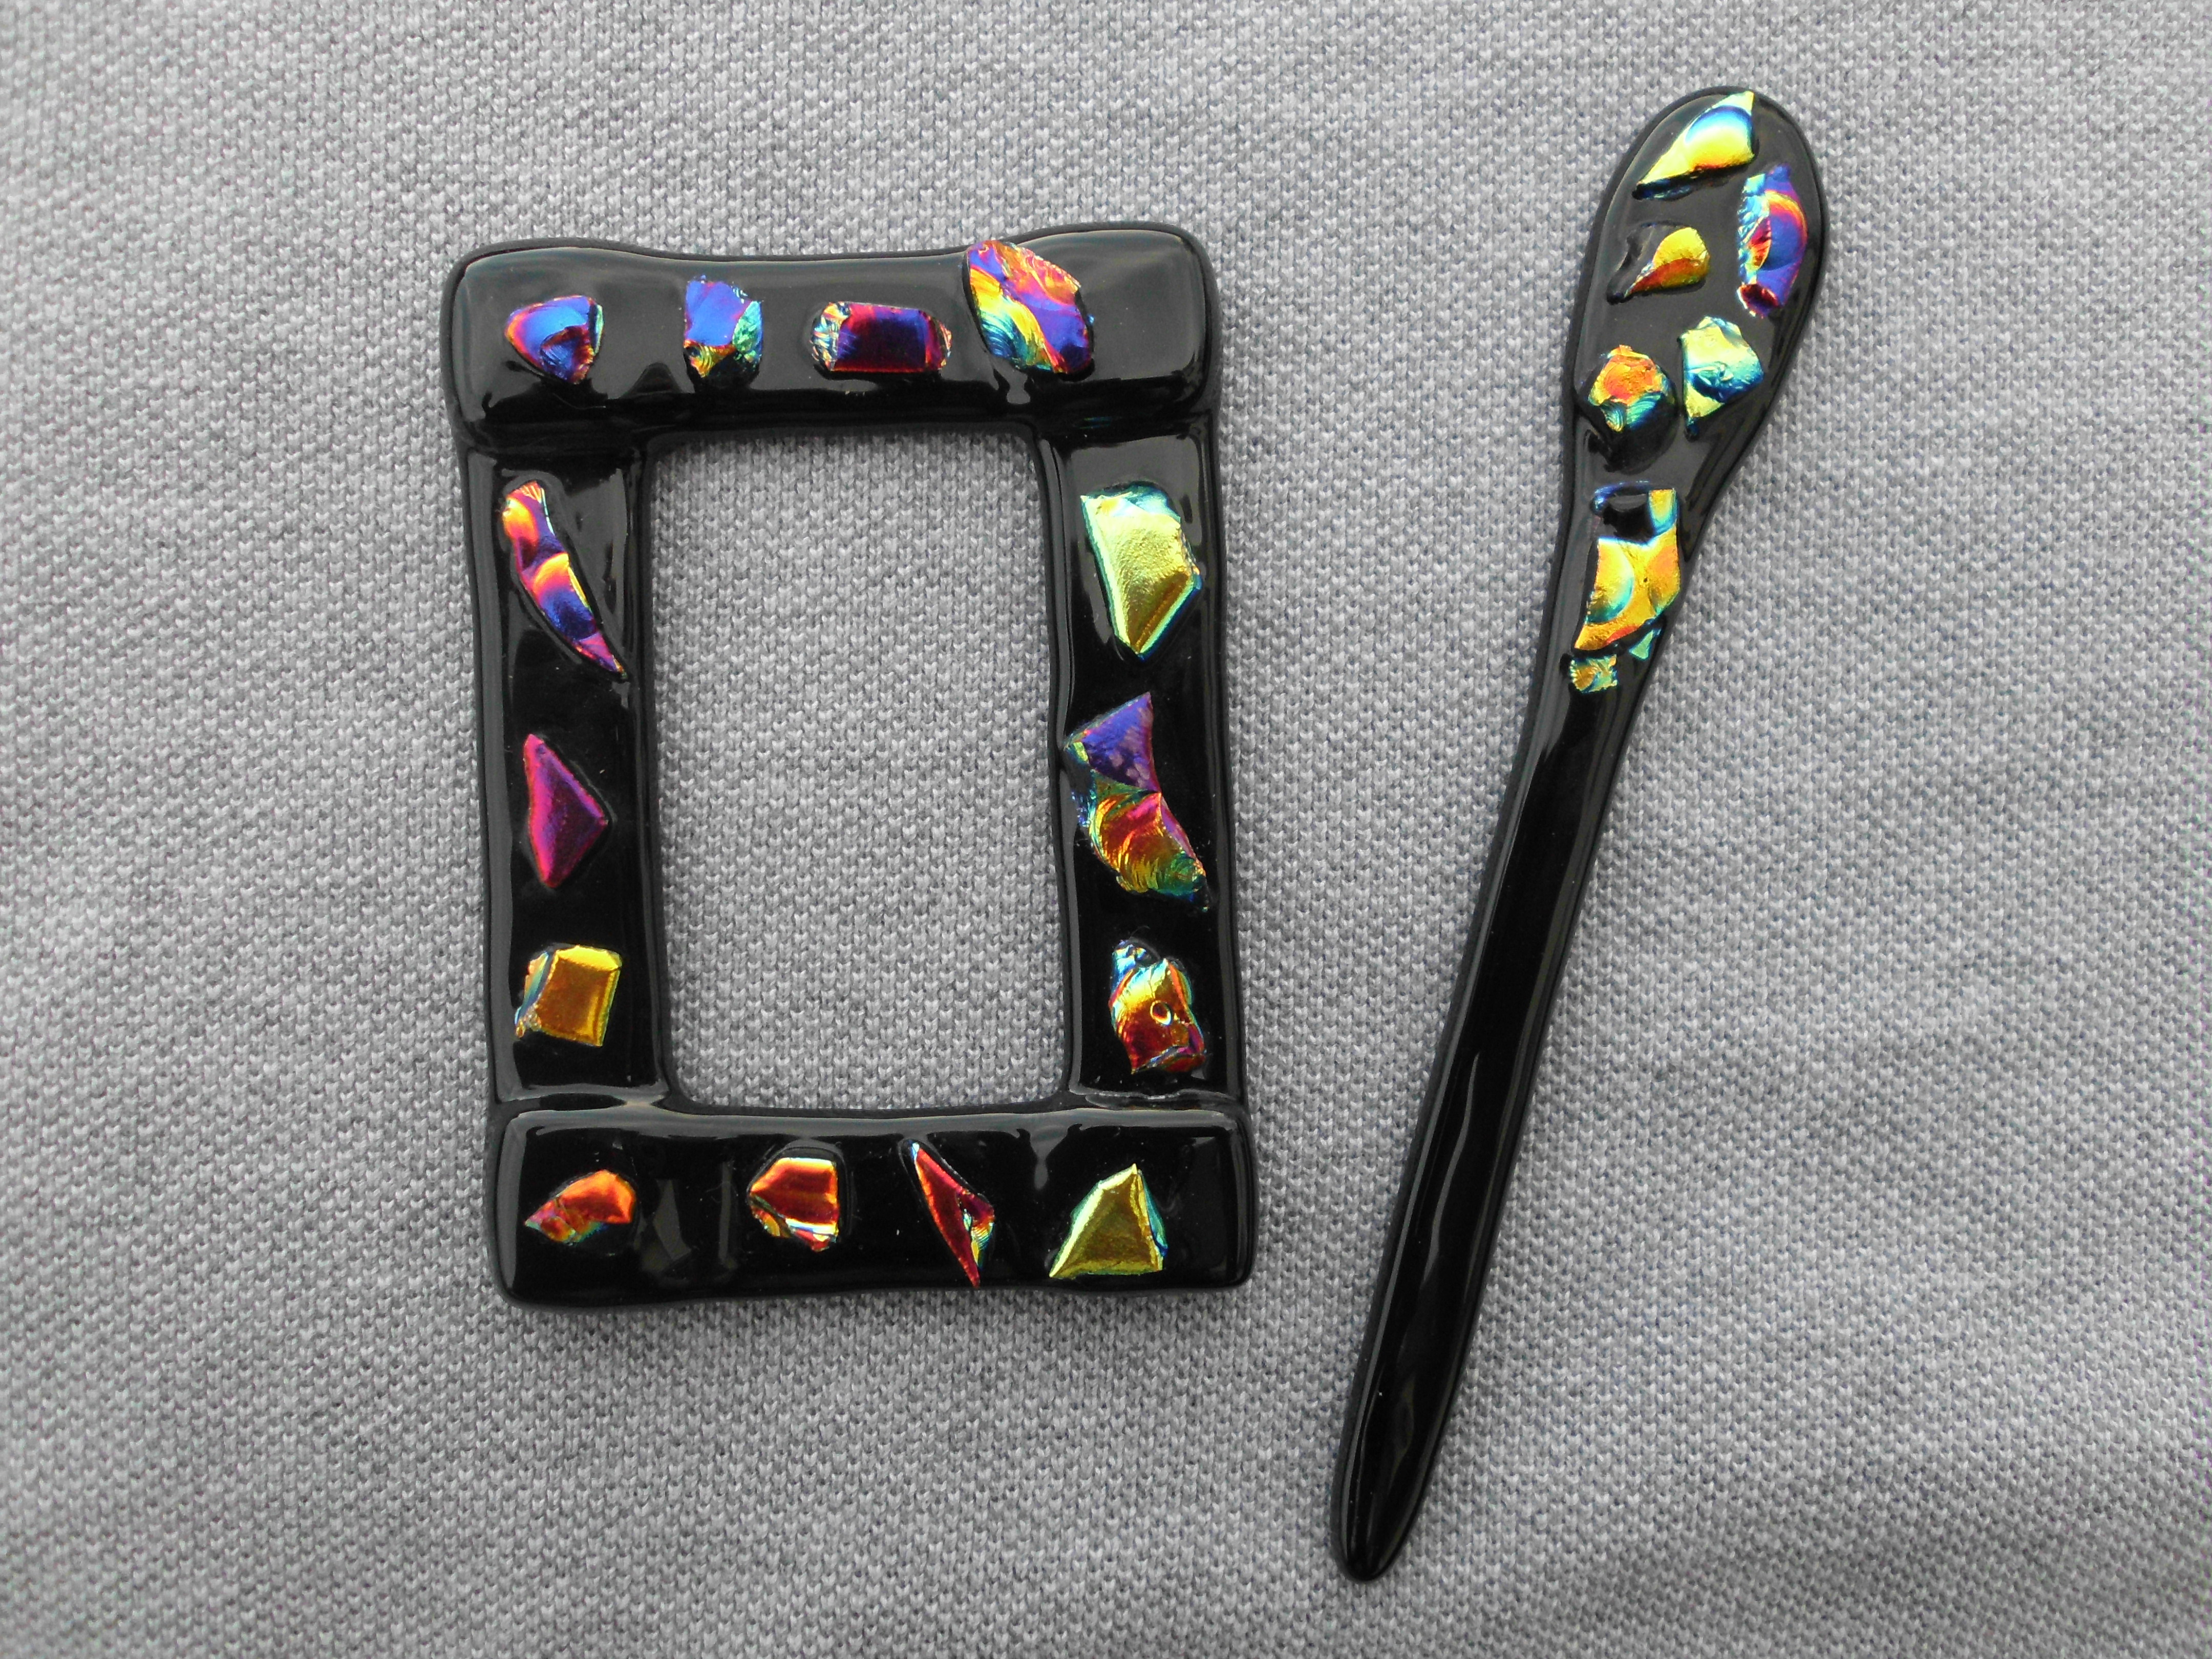
Here is a beautiful fused glass shawl pin I created in 2011.  It has black background glass and beautiful pieces of dichroic glass fused to the black glass.  I would love to make you a special shawl pin just for you in any color you desire.  #fusedglass

SANY0086


Posted on Leave a comment

Amber Small Bead Necklace With Swarovski Crystals

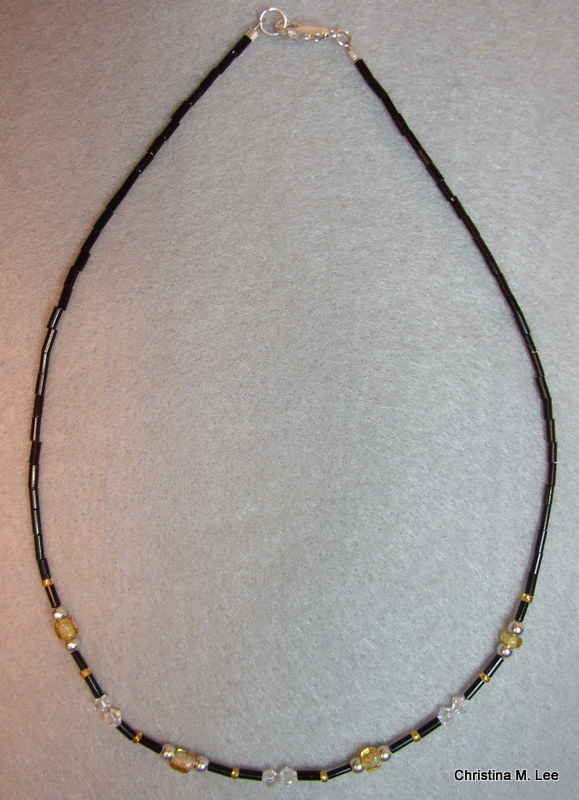
I thought would share with you a pretty little necklace I made in 2009.  It has 4 very small amber handmade (lampwork) beads which I made under my torch.  I strung my handmade beads with Swarovski crystals, sterling silver beads, and seed beads.

Closeup of my handmade beads and the Swarovski and silver beads.

I would love to design a one-of-a-kind special necklace for you.  Please contact me.

Posted on Leave a comment

Lampwork Glass Bead Making Class

Hi everyone, hope your having a wonderful holiday season so far.   I am so excited to be teaching a Lampwork Bead Making Class on Saturday January 2, 2016 from Noon to 5 pm.

I have room for 1 more student in the Class.   Here is some info on the class:

LAMPWORK BEAD MAKING: This class teaches you how to make your own handcrafted lampwork or flamework glass beads.  Glass rods are melted under an open torch and formed into glass beads.  You will learn about expansion of glass, compatible glasses, how to anneal your beads, and much more.  $100.00 includes all supplies and the use of all tools (you take home your finished beads).  This is a one secession class, 5 hours long.  The class is limited to two students.

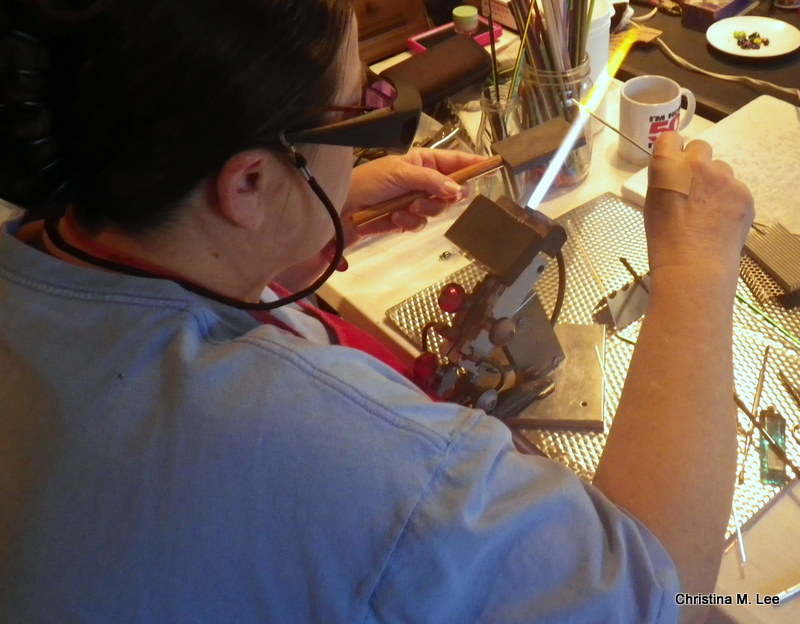
Here are some pics of bead making:

RIMG0843

Me melting the glass under the torch.

RIMG0840

Above and below, Shaping the bead.

RIMG0841

RIMG0846

Adding decoration to the bead.

RIMG0847

More shaping the bead

RIMG0852

Adding clear glass over the top of the bead

RIMG0848

The bead taking the final shape

RIMG0859

Beads right out of the torch.  The bead on the left is the one I was making in the pics above

RIMG0865Final beads after they come off the rods. Bead in the center is the one I am making in the pics above.

My classes very individualized providing you the one-on-one instruction that you will not receive in a larger class setting.   Let me know if you want to take this class.

I hope everyone has a wonderful, very Merry Christmas, a fantastic Holiday Season however you celebrate, and a Happy New Year.    Christina

#lampwork, #flamework, #glassbeadmaking, #classes

Posted on Leave a comment

Jewelry Care Tips

Here is my Jewelry Care Tip of the day.  This is how I keep my Sterling Silver, 14k Gold, my fused glass and precious metal clay (PMC) pendants, my glass lampwork beads and semi-precious stones looking shiny and pretty.  I use Connoisseurs Jewelry Wipes.  I am not affiliated with the company or the product.  I just use it, and like it.  One wipe can be used over and over and over again for months.  One box will last you for years.  The wipe also puts a protective non-tarnish coat on your sterling silver and protects your jewelry from tarnishing longer.

 Jewelry WipesI just thought I would share with you how easy it is to keep your jewelry looking shiny all the time.  You can buy them at any jewelry counter or on the web.

#jewelry, #jewelrycaretip, #sterlingsilver, #fusedglass, #PMC

Posted on 3 Comments

Free Crochet Pattern: Double V Shell Afghan with Scalloped Edges

Double V Shell Afghan with Scalloped Edges

By Christina M. Lee, June 30, 2015

(For Lapgan Measurements see end of pattern)

SANY0003

Skill Level:  Easy/Beginner

Materials:
Caron Simply Soft (5 skeins 6 oz skeins) or any 4 ply worsted weight yarn
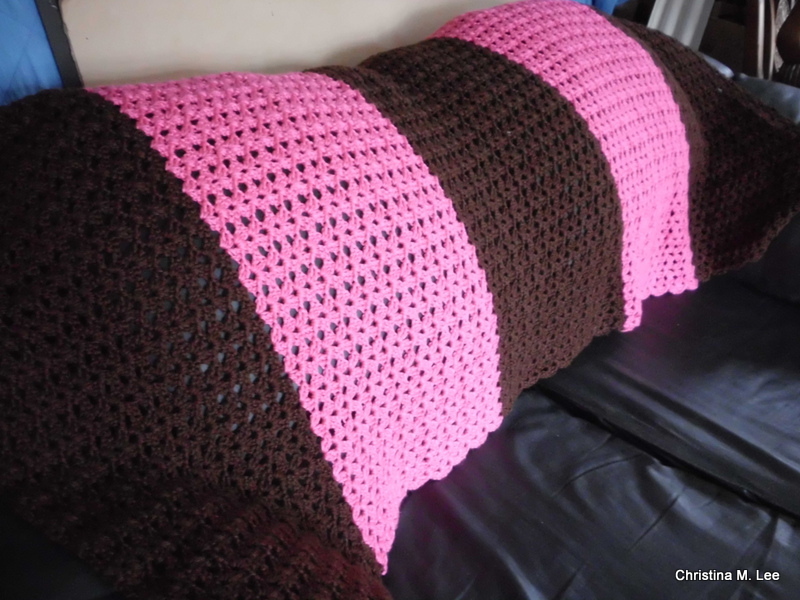
Color A: 3 skeins Chocolate, Color B: 2 skeins Watermelon, or colors of your choice.
Crochet hook size H

Special Stitches: Double V Shell (dvs) = 2 dc, ch 2, 2 dc in same space, will be referred to as dvs in pattern below.

Gauge: Not important

SANY0011Close up of the Double V Shell stitch
SANY0016Close up of the scalloped edge.

Pattern:
With color A Ch 168.
Row 1. dvs (Double V Shell, see special stitches above) in 4th ch from hook (see above for instructions on how to make dvs), *skip 4 ch, dvs in 5th ch*, repeat across between **. Ch 3 turn.

SANY0002Here is what the Double V Shell (dvs) stitch looks Like and the beginning of row 1.
SANY0004End of Row 1

Row 2. *dvs in the top of the 2 ch space of the dvs in previous row*, (in the center top of shell) repeat between ** across. Ch 3 turn.

SANY0007End of Row 2, you can now see the scalloped edges starting to form.

Rows 3-17 (approximately the whole skein of yarn): Repeat row 2.
Rows 18-34: Change to color B. Repeat row 2.
Rows 35-51: Change to color A. Repeat row 2.
Rows 52-68: Change to color B. Repeat row 2.
Rows 69-85: Change to color A. Repeat row 2.
Final row. *sc in the top of the 2 ch space of the dvs in previous row, ch 5*, repeat between ** across. Fasten off.

Approximate final measurement of afghan are 45” x 60”

PATTERN UPDATE, 2/29/16: I made a nice lapgan out of this pattern by ending at row 55. Then going to the Final Row. I changed colors of yarn every 5 rows.  I used “I Love This Yarn” from Hobby Lobby.  Approximate Lapgan six 45” x 36”

~~~~~~~~~~~~~~~~~~~~~~~~~~~~~

I hope you have fun creating your afghan. Please share pictures of your completed afghan with me, feel free to post them here on my blog.  I would love to see your completed afghan.

You can also post your pictures of your finished afghan and comments about the pattern on my Facebook page, Knitting & Crochet Friends.

~~~~~~~~~~~~~~~~~~~~~~~~~~~~~

This is an Original Design by Christina M. Lee. Copyright June 30, 2015, Lee Creations, Inc., d/b/a Christina M Lee Designs.   Please feel free to use my pattern to make as many afghans as you desire, give them away, sell them freely.

You are prohibited from selling the pattern or claiming the pattern is your own, or publishing the pattern in any printed material without my explicit permission. You are prohibited from publishing, copying, or using the photographs in the pattern in any manner without my explicit permission.

I would please ask that when you share the pattern you give me credit for the pattern and post a link back here to my blog or my website.

If you have any questions about the pattern, or need any help with the pattern, please feel free to contact me. You may email me at Christina@creationsbychristina.net or post a comment here on this blog or my Knitting & Crochet Friends Facebook page.  Please feel free to share this pattern on social media.

Happy crocheting,  Christina

Follow my blog via email.  Be among the first to receive my blog posts and to know about specials and sales, click the ‘subscribe’ button in the right hand column .

Posted on Leave a comment

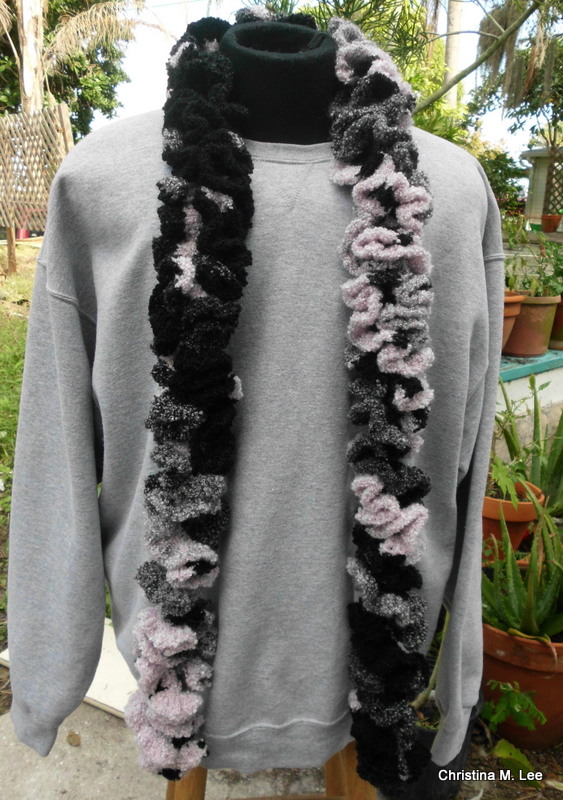
Free Crochet Pattern: Ruffled Boa

RUFFLED BOA

May 17, 2015

By: Christina M. Lee

SANY0004

Skill Level: Easy

Gage: Not important

Materials:
1 skein, Sensations, Rainbow Bouncle Patterns (Self-Patterning Bouncle) Pink/Grey Rainbow
(Note: I used 1 large 11 oz skein, if using a different type of yarn in a smaller skein, please adjust yarn accordingly.  I  had plenty of left over yarn from this skein, enough I made a pair of fingerless gloves and a stocking type hat to match my boa, and still had some left.  A regular worsted weight yarn makes the Boa too heavy (believe me, I tried it). If you change yarns, use something soft, light and fuzzy such as a baby weight yarn.)
Crochet Hook Size I/9 (5.5 mm)

Pattern:
Chain 161
(Note: Pattern is worked in round continuously on right side, do not turn.)
Round 1:  sc second ch from hook, sc in each ch across to the last ch, 3 sc in last ch. Do not turn your work. Continue to sc around on the bottom side of the chain in the open (unworked) loop all the way across the back side of the row of chain stitches back to the beginning. 3 sc in last loop, sl st to first ch creating one continuous oval, ch 2. (159 sc on each side of chain, with 3 sc in each end stitch.) 324 stitches.
Round 2:  2 dc in same stitch, (the first ch 2 acts as one dc), *3 dc in next sc*, repeat ** across this side, 6 dc in end st, *3 dc in next sc*, repeat ** across this side, 6 dc in end st, sl st in top of first ch 2 of row. Ch 2.
Round 3:  2 dc in same st, (the first ch 2 acts as one dc), *3 dc in next sc*, repeat ** around, back to beginning, sl st to beginning ch 2. Fasten off.

SANY0013I hope you have fun creating your own Boa. Please share pictures of your completed Boa with me, feel free to post them here in the comments section.  I would love to see your creations.

You may also post your pictures of your finished Boa and comments about the pattern on my Facebook page, Knitting & Crochet Friends

~~~~~~~~~~~~~~~~~~~~~~~~~~~

This is an Original Design by Christina M. Lee. Copyright May 17, 2015, Christina M. Lee, Lee Creations, Inc. d/b/a Christina M Lee Designs.   Please feel free to use my pattern to make as many Boas as you desire, give them away, sell them freely.

You are prohibited from selling the pattern or claiming the pattern is your own, or publishing the pattern in any printed material without my explicit permission. You are prohibited from publishing, copying, or using the photographs in the pattern in any manner without my explicit permission.

I would please ask that when you share the pattern you give me credit for the pattern and post a link back here to my blog or my website. or to my Knitting & Crochet Friends page on Facebook.

If you have any questions about the pattern, or need any help with the pattern, please feel free to contact me. You may post comments here on my blog, may email me at Christina@creationsbychristina.net or via my Knitting & Crochet Friends Facebook page.

Happy crocheting,  Christina

Follow my blog via email.  Be among the first to receive my blog posts and to know about specials and sales, click the ‘subscribe’ button in the right hand column.


Posted on Leave a comment

Classes I teach: Bead Stringing

BEAD STRINGING: In this class you will learn the basic bead stringing techniques, including crimping and how to make a basic loop and a wrapped loop.  Class fees are $40.00 and includes all supplies.  This is a one secession, 3 hour class.  You will take home a completed necklace or bracelet.

SANY0016

Classes are available by appointment only:

Due to limited space available for teaching, my Classes are limited to 1, 2 or 3 students per class depending on the class.  I can accommodate more students if the class is held at the location of your choice. 

Small class settings allow my classes to be very individualized providing you the one-on-one instruction that you will not receive in a larger class setting.  Small classes also allow me to be flexible in my teaching schedule.

Classes are generally weekday evenings, or Saturdays during the day or evenings, but I can work with you to fit your class around your schedule.  I thoroughly love teaching, click here to see a list of other classes I teach: http://creationsbychristina.net/?page_id=913

Follow my blog via email.  Be among the first to receive my blog posts and to know about specials and sales, click the ‘suscribe’ button in the right hand column .

Posted on Leave a comment

My First YouTube Video

Made my first video about my crocheted Sock Monkey Hat & Mittens for sale.

Sock Monkey Hat & Mittens It is basic and simple and no sound.  Was just trying to see if I could do it.  Proud of myself.  Check it out.  It is probably kind of corny for all you experienced YouTubers out there, but hey, gotta start somewhere, right?

https://www.youtube.com/watch?v=BNOh6OrU5lg

By the way, sold the sock monkey hat and mittens right away, so the video was a success.  If you would like a set I can crochet you one.

All fiber arts created in a smoke free, pet free environment.

Posted on Leave a comment

Classes I teach: Lampwork Bead Making

LAMPWORK BEAD MAKING:

This class I teach you how to make your own handmade lampwork or flamework glass beads.  Glass rods are melted under an open torch and formed into glass beads.  You will learn about expansion of glass, about compatible glasses, how to anneal your beads, and much more.  $100.00 includes all supplies and use of all tools (you take home your finished beads).  This is a one secession class, 5 hours long.  The class is limited to two students.

Classes are available by appointment only:

Due to limited space available for teaching, my Classes are limited to 1, 2 or 3 students per class depending on the class.  This makes my classes very individualized providing you the one-on-one instruction that you will not receive in a larger class setting.  This also allows me to be flexible in my teaching schedule.

Classes are generally weekday evenings, or Saturday during the day or evenings.  I can also work with you to fit your class around your schedule.  I can arrange a weekday afternoon class if that is the only time you have available.  I thoroughly love teaching, so click here to see a list of other classes I teach: http://creationsbychristina.net/?page_id=913

Follow my blog via email.  Be among the first to receive my blog posts and to know about specials and sales, click the ‘subscribe’ button in the right hand column.


Posted on Leave a comment

Why You Shouldn’t Ditch Your Slowest Seller

Here is a great article:

Why You Shouldn’t Ditch Your Slowest Seller

How Your “Slowest” Seller
Could Actually Be Your Best Marketing

There are two tenets in business that everyone accepts as true:

  1. You should figure out what your most popular product is, and sell the heck out of it.

  2. You should figure out what your least popular product is, and get rid of it.

Here’s a little story about why you should reconsider step 2.

Read More…..http://jewelrymakingjournal.com/why-you-shouldnt-ditch-your-slowest-seller/

Posted on Leave a comment

Fused Glass Wind Chimes

Here are the Fused Glass Wind Chimes I made for my Son, Robert, for his birthday, yesterday.  I just realized I have not posted any blog posts since after Thanksgiving.  Was totally swamped over the holidays.  Seems like the days just get by so very fast anymore.

SANY0002 I made them small because in the next 7 or 8 months the kids are going full time into an RV.  They have been downsizing so I wanted something that could travel with them.

SANY0009Here is a close up of the top, black glass with colored dichroic chips and stringers fused onto it.

The top piece is about 3 x 3 inches.

SANY0008A close up of the upper 3 chimes.  Blue streaky glass and Purple glass with bits of dichroic glass fused onto them.

Each chime is approximately 1/2 inch wide by 3 inches long.

SANY0007And a close up of the lower 3 chimes.

The two outside chimes are actually Dark Purple glass, when held up to the light you can see they are purple.

All together is was quite a fun little project to create.  The first set of Wind Chimes I have ever made.  I strung the chimes with 8 lb fishing line my Hubby, Rick, had and used a fishing swivel for the top to hang them from.

Drilling all the holes in the glass before I fired them in the kiln, and tying the knots in the fishing line to string each of the chimes, all took quite a bit of time.  I also had to learn to tie a couple of new knots, fishing knots, so the knots would not come untied and the glass fall off and break later on.  Thanks Rick for sharing some You Tube videos.


  To follow my blog, click on the purple diamond at the bottom of the links section on the right hand side of the page at the bottom of the links section above ———>

Posted on Leave a comment

Totally Stuffed like the Turkey

Hope everyone had a very wonderful Thanksgiving.  I am totally stuffed just like the Turkey was.  Actually my sis in law fixed a Turducken.  It was fantastic!!!!

Totally excited I sold my first piece in my Etsy Shop, my Fused Glass Shawl Pin below:

SANY0086

This pin is made with dichrioc glass in copper, purple, blue fused onto a black base.  I can create these in any color you prefer. $35.00 each.

Hope you got to share your Thanksgiving with family.  Many blessings to all!!!

To follow my blog, click on the purple diamond on the right hand side of the screen below the links section —————->

Posted on Leave a comment

Happy Thanksgiving.

Wishing all of you a wonderful Thanksgiving.

I am back to blogging and creating new jewelry.  Look for new posts and pics coming in the next few weeks.  Will get back in full swing after the holidays. So sorry I have not posted in such a long time.  What can I say, life happens.

I leave you with this collage of some of my work.  The background is a hand painted silk scarf I designed with butterflies, a pair of black and blue handmade (lampwork) beaded earrings, and a black, red and white memory wire bracelet with a handmade (lampwork) black, red and white focal bead.

A Collage of my Work

Wishing each and every one of you a blessed holiday season.  Christina

To follow my blog, click on the purple diamond on the right hand side of the page under the links section.  —————->

Posted on Leave a comment

Devin’s Scarf

Devin’s Scarf
May 5, 2013
Free Crochet Pattern

SANY0050Devin’s My handsome Grandson, Devin, modeling his scarf, Christmas 2010

This is a scarf I designed for my grandson, Devin, for Christmas December of 2010.  I just got around to writing up the pattern almost two and a half years later.

Silk Level:  Easy
Gauge: Not important
Materials: Vanna’s Choice by Lion Brand, 2 skeins Denim Mist or color of your choice.
(Or any 4 ply worsted weight yarn, such as Red Heart Super Saver, Red Heart Soft, I Love This Yarn, Loops and Threads, Caron Simply Soft, or Patons Classic Wool)
Crochet Hook:  Size I

Stitches used: chain stitch, single crochet, and double crochet.
Finished Measurements of Scarf:  Approximately 7 inches wide and 75 inches long.

Download a pdf version of pattern here: Devin’s Scarf

SANY0007Finished Scarf

Pattern:
Ch 24
(Note: The two turning chains at the end of each row count as a double crochet at the beginning of the next row throughout.)
Row 1:  dc in third ch from hook and in each ch across, ch 2 turn. (22 stitches)
Row 2:  dc in very first stitch and in each dc across, ch 2 turn. (maintaining 22 stitches)
Rows 3-6:  Repeat row 2.
Row 7: dc in each of the first two dc (for a total of 3 dc counting the turning chains as a dc), *ch 1, skip next stitch, dc in each of the next 2 dc, repeat from * to last 3 stitches and dc in each of the last 3 stitches, ch 2 turn.

SANY0006-0013 dc counting the turning chains as a dc at beginning of Row 7

Continuing after the 2 dc:  1 ch, skip 1 sp, 1 dc (see row 7 above)

SANY0009-001Continuing row 7 in pattern stitch

Rows 8-9: Repeat row 2.
 SANY0003-002This is what the pattern looks like, row 7 will be the row with the open spaces above.
Rows 8 and 9 will look like the two rows after the row with the opens spaces in the pic above.

Row 10: Repeat row 7.
Rows 11-16: Repeat row 2.

Row 17: Repeat row 7.
Rows 18-19: Repeat row 2.
Row 20: Repeat row 7.
Row 12-85: Repeat row 2.

(Note:  For a shorter scarf delete rows from this section.  In order to have the opposite end of the scarf match the first end, delete rows evenly by twos.)

Row 86: Repeat row 7.
Rows 87-88: Repeat row 2.
Row 89: Repeat row 7.
Rows 90-95: Repeat row 2.
Row 96: Repeat row 7.
Row 97-102: Repeat row 2.  Fasten off.  Work in ends.

 SANY0001-001Close up of pattern stitching

Add some fringe if you desire and make this for a female.  I hope you have fun creating your scarf.  Please post pictures of your finished scarf in the comments section of my blog page or on my Facebook page.  I would love to see what you created with my pattern.

My Facebook page is: Knitting & Crochet Friends

Thank you, Happy Crocheting.  Christina.

~~~~~~~~~~~~~~~~~

This is an Original Design Crochet Pattern by Christina M. Lee.  Copyright Christina M. Lee and/or Christina M. Lee Designs May 1, 2013.   Please feel free to use my pattern to make as many scarves as you desire, give them away, sell them freely.

You are prohibited from selling this pattern or claiming is as your own, or publishing it in any printed material without my explicit permission.  You are prohibited from publishing, copying, or using the photographs in any manner, any place, or any format, without my explicit permission.

I would please ask that when you share the pattern that you give me credit for the pattern and post a link back to my blog page http://christinamleedesigns.com/?p=1765

If you have any questions about the pattern, or need any help with the pattern, please feel free to contact me.  You may email me at christinaleedesigns@verizon.net.


Posted on Leave a comment

Coating Jewelry Pliers with Tool Magic

I am in love, found a great new product.  I have been trying to do some wire wrapping and am trying to do it without scratching the Sterling Silver Wire.  I found a product called “Tool Magic”.  You coat your jewelry pliers, the tips, with Tool Magic to prevent the wire being scratched by the pliers.

SANY0005-003

Here is the Tool Magic and my pliers after I coated them.  Sooooo nice.


SANY0007-003

Close of my jewelry pliers after coating with Tool Magic.  Now I can work on my wire wrapping without scratching the Sterling Silver Wire.


To follow my blog, click on the purple diamond on the right hand side of the screen under the links section —>


Posted on Leave a comment

Free Form Scarf, Part 4

Here is the final post on my first Free Form Crochet Scarf and my adventure into a new type of Fiber Arts, at least new to me, Free Form Crochet or FF.

In Part 1, I showed my first 3 ‘scrumbles’, (the individual sections of the scarf, each small cluster is called a scrumble.)

In Part 2, I showed ‘scrumbles 4-10, and in Part 3, I showed a detailed stitch by stitch demo of scrumble # 11.

In this post, I am going to show off the final scrumbles of the Scarf, and the completed Scarf.


SANY0036-001

Here is the completed Scrumble # 11, which I showed how to make in the previous post.


SANY0035-001

Scrumble #12


SANY0034-001

Scrumble # 13


SANY0039-001

And Scrumble # 14, the final scrumble of the Scarf.


SANY0011-002

The final completed Scarf.


SANY0014-001

Here is the back of the neck, of the completed Scarf.


SANY0015-001

Side view of the Scarf.


SANY0016-001

The other side view of my Scarf.


SANY0019-001

Another view of the side.


SANY0024-001

Final View of my Scarf.


I have become a member of the International Free Form Fiberarts Guild.  It is free to join.  There are plenty of wonderful people out there who will help you and encourage you to venture out into FF.  If you have any questions please message me.  If I cannot answer them I will find someone who can.

Here is a link to the Free Form Fiberarts Guild  http://groups.yahoo.com/group/FFCrochet/

Happy crocheting!!!


To follow my blog, click the purple diamond on the right hand side of the screen under the links section—–>


Posted on Leave a comment

Free Form Scarf, Part 3

Welcome to Part 3 of my Free Form Scarf.

See earlier posts on this blog for Free Form Scarf Part 1 and Part 2.  This is my very first Free Form Crochet piece.  I have ventured out into a new to me art form in fiber arts, no patterns, just crochet; changing stitches, changing yarns and just creating as you go along.  I love the textures that I am creating.  Each small section is called a ‘Scrumble’  I finished it some weeks back and am just getting around to posting.  Sorry, life happens and I get busy.

In Part 1, I showed my very first 3 scrumbles, the beginnings of the Scarf.

In Part 2, I showed scrumbles 4-10, and the completed scarf to that point, which was about two thirds complete.

In this post, I have decided to show the creating of scrumble # 11 in some detail.  To give you an idea of how I created each scrumble and how I created this scarf, and to also give you inspiration to create your own FF piece.

SANY0079

 I started at the top of the 10th scrumble creating the 11th scrumble.  I hooked the pink and white stripped yarn on, and single crocheted around the purple chain stitch, (pic above).


SANY0082I then started across the top of the purple with a couple of single crochets.  I chained 5 stitches and skipped 4 single crochets and slip stitched in the 5th single crochet of the purple row.


SANY0086At this point I decided to turn my work.  I then chained 2 and turned.  I am now working on the back side.  I started making puff stitches across the open chain stitch area.  Puff stitches are created by making 4, 5 or 6 double crochets but not finishing the stitch and keeping the last loop of each stitch on the hook and starting the next double.  You then pull one final loop through all 4, 5 or 6 loops on the hook and pull them together tight and slip stitch, forcing the yarn to puff out ward.  The puffs show on the right side.

SANY0091

 The rest of the puff stitches are complete across the open chain space.  Remember this is the back side of the work, they are puffed out on the right side.

SANY0094At this point I decided to change yarn.  I changed to a pretty blue and pink textured yarn.  I am having so much fun.  You look through the bag of scrap yarn and think, that color would be good to use next, and you go for it.

SANY0095I created some more puff stitches across the top of the single crochets from the row before with the blue and pink yarn.

SANY0098 Here is a pic of the front of the work showing the puff stitches.  I really love the texture of this yarn.


SANY0100

This pic shows the front side of both the blue and pink puff stitches and the pink and white puff stitches.  Notice the different look and texture of they yarns and the difference in the puff stitches.  Quite interesting effect making the same stitches with different yarns.


SANY0104

Next, I worked behind the pink and white twisted yarn puff stitches.  Chaining 1 or 2 stitches and slip stitching between the puffs.  Laying some foundation chain stitches behind the puffs to work the next row off of.  I worked these behind the puffs, then at the end of the row I chained 2 and turned and started placing double crochets around my chain stitches behind the pink and white puff stitches.  Now I am again working on the back side of the scrumble. (You can see the chain stitches behind the puffs I placed on the row before.)

SANY0107I continued putting some double crochet stitches, some triple crochet stitches behind the pink and white puff stitches I made on the previous row.  Still working on the back side of the scrumble and working these around the 1 or 2 chain stitches I placed between the puff stitches on the back side.

SANY0117This pic shows the completed row.  I came across the row with double crochets, triple crochets, then dropped down to single crochets as I came across to the purple through the center.

SANY0124

I then attached the coral yarn and chained 1 and turned.  I started putting 3 single crochets in each stitch to force the piece to ruffle.  (Note the blue and pink doubles and triples behind the pink and white puff stitches on the left hand side of the pic.)

SANY0125You can now see the coral is forcing a ruffle.  3 single crochets in each stitch across.

SANY0131And here is the completed # 11 scrumble in my Scarf.

I will show the rest of the scrumbles and the completed scarf in my next blog post.  If you have not tried Free Form Crochet or FF for short, I encourage you to try it.  It is quite fun.

I have become a member of the International Free Form Fiberarts Guild.  It is free to join.  There are plenty of wonderful people out there who will help you and encourage you to venture out into FF.  If you have any questions please message me.  If I cannot answer them I will find someone who can.

Here is a link to the Free Form Fiberarts Guild  http://groups.yahoo.com/group/FFCrochet/

Happy crocheting!!!


To follow my blog, click the purple diamond on the right hand side of the screen under the links section—–>


Posted on Leave a comment

Award Winning, Crocheted Wool Eater Blanket

Award Winning, Crocheted Wool Eater Blanket made for my Husband, Rick.

SANY0015

I entered this blanket into the Manatee County Fair and won 1st Place in January.  I used Homespun yarn, by Lion Brand, in this project. Homespun is a bulky yarn.  It made the blanket very heavy and very soft.  My husband just loves it and so do it.  It covers most of our king size bed, but not completely.  I had to lay it on the dinning room floor and stand on a step stool to get the pics of the whole blanket.  I so enjoy being creative with fiber arts, it is very laxing.

SANY0014

Here is a close up of the scolloped stitching and the edge of the blanket.

I used 16 skeins of yarn in it.  About $65.00 worth of yarn.

SANY0029-001

Here is the blanket at the Fair

SANY0009-001

Here are my entry form and my blue ribbon

SANY0011

Here is the note the Judge wrote on the back of my entry form.


I entered 9 items in the Fair this year, 4 jewelry, 4 crochet, and 1 fused glass, and I won 7 1st Place awards and 2 2nd Place awards.  This is my 3 year entering the Fair and it is a lot of fun.  I encourage everyone to enter you local county fair.  More pics to come here on the blog of my award wining entries.

Here is a link to the pattern I used http://sarahlondon.wordpress.com/2009/08/25/wool-eater-instructions/.


To follow my blog, click on the purple diamond on the right hand side of the screen below the links section —->