Posted on Leave a comment

First Artwork Done in New Art Studio

I took a break from all the painting of walls and floors to do a little creating.  I needed a birthday gift for a friend, so decided to fuse some glass.

Covered my table with butcher paper and set up all my tools, molds and glass.

img_1041

Set up my glass band saw and glass grinder and filled them with water.  They have diamond bits and so I have to water cool the bits.img_1043

Laid out the glass and the mold and drew up the pattern on the glassimg_1044

Shinning the light through the stained glass so you can see how pretty it is. img_1046

Cutting the first glass heart. img_1052

Cutting the second glass heart.img_1062

Laying out the stained glass and the dichroic glass I plan to fuse onto the heart-shaped bowls, and preparing the molds for fusing. img_1063

Fiber paper placed between the molds and the glass so the glass will not stick to the molds as it slumps down into the molds.  Molds in the kiln, and ready to fire. img_1076

Kiln door closed and started on high.  I set my desktop 110 kiln on top of the large kiln temporarily so I could fire it, as the counter top has not been build yet where it will repose permanently. img_1079

50 minutes of firing in the kiln, then cool down.  Once the kiln is shut off I cannot look in it until the glass is completely cooled for risk of it cracking.  That is always the hardest part, waiting to see the finished pieces! The next morning I opened the kiln and, yay!  Good firing!!!  img_1081

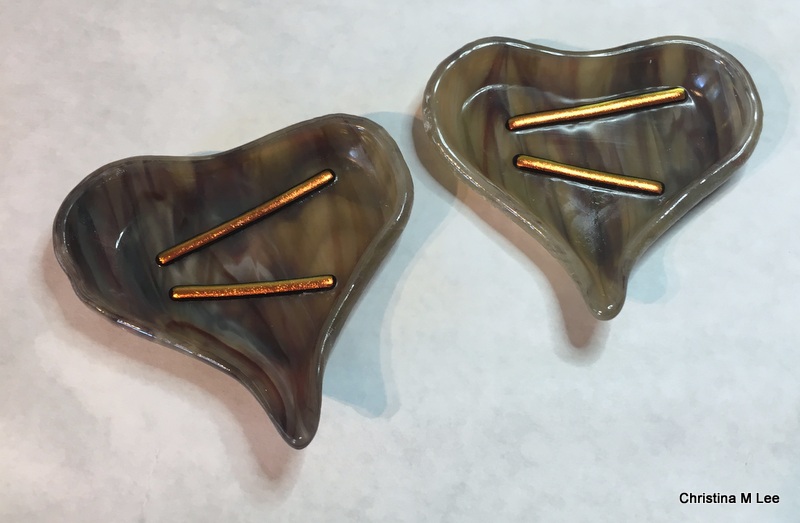
Glass removed from the molds and cleaned, signed and dated on the back. The finished fused glass heart-shaped bowls!img_1086

Linda loved her birthday gift.  These small fused glass heart-shaped bowls are great for putting rings and earrings in on top of your dresser at night.  They are one of my popular sellers.  I can create them in any color under the rainbow.img_1141

And there you have the very first artwork created in my new art studio.  It was so nice having all that room to spread out, work and create, and so much fun creating after the long break of building the studio.  Even though the studio is not done yet, I improvised.

#newartstudio #artstudio, #instalike #instagood #picoftheday #dreamcometrue #fusedglass #creative


Posted on Leave a comment

Free Form Scarf, Part 3

Welcome to Part 3 of my Free Form Scarf.

See earlier posts on this blog for Free Form Scarf Part 1 and Part 2.  This is my very first Free Form Crochet piece.  I have ventured out into a new to me art form in fiber arts, no patterns, just crochet; changing stitches, changing yarns and just creating as you go along.  I love the textures that I am creating.  Each small section is called a ‘Scrumble’  I finished it some weeks back and am just getting around to posting.  Sorry, life happens and I get busy.

In Part 1, I showed my very first 3 scrumbles, the beginnings of the Scarf.

In Part 2, I showed scrumbles 4-10, and the completed scarf to that point, which was about two thirds complete.

In this post, I have decided to show the creating of scrumble # 11 in some detail.  To give you an idea of how I created each scrumble and how I created this scarf, and to also give you inspiration to create your own FF piece.

SANY0079

 I started at the top of the 10th scrumble creating the 11th scrumble.  I hooked the pink and white stripped yarn on, and single crocheted around the purple chain stitch, (pic above).


SANY0082I then started across the top of the purple with a couple of single crochets.  I chained 5 stitches and skipped 4 single crochets and slip stitched in the 5th single crochet of the purple row.


SANY0086At this point I decided to turn my work.  I then chained 2 and turned.  I am now working on the back side.  I started making puff stitches across the open chain stitch area.  Puff stitches are created by making 4, 5 or 6 double crochets but not finishing the stitch and keeping the last loop of each stitch on the hook and starting the next double.  You then pull one final loop through all 4, 5 or 6 loops on the hook and pull them together tight and slip stitch, forcing the yarn to puff out ward.  The puffs show on the right side.

SANY0091

 The rest of the puff stitches are complete across the open chain space.  Remember this is the back side of the work, they are puffed out on the right side.

SANY0094At this point I decided to change yarn.  I changed to a pretty blue and pink textured yarn.  I am having so much fun.  You look through the bag of scrap yarn and think, that color would be good to use next, and you go for it.

SANY0095I created some more puff stitches across the top of the single crochets from the row before with the blue and pink yarn.

SANY0098 Here is a pic of the front of the work showing the puff stitches.  I really love the texture of this yarn.


SANY0100

This pic shows the front side of both the blue and pink puff stitches and the pink and white puff stitches.  Notice the different look and texture of they yarns and the difference in the puff stitches.  Quite interesting effect making the same stitches with different yarns.


SANY0104

Next, I worked behind the pink and white twisted yarn puff stitches.  Chaining 1 or 2 stitches and slip stitching between the puffs.  Laying some foundation chain stitches behind the puffs to work the next row off of.  I worked these behind the puffs, then at the end of the row I chained 2 and turned and started placing double crochets around my chain stitches behind the pink and white puff stitches.  Now I am again working on the back side of the scrumble. (You can see the chain stitches behind the puffs I placed on the row before.)

SANY0107I continued putting some double crochet stitches, some triple crochet stitches behind the pink and white puff stitches I made on the previous row.  Still working on the back side of the scrumble and working these around the 1 or 2 chain stitches I placed between the puff stitches on the back side.

SANY0117This pic shows the completed row.  I came across the row with double crochets, triple crochets, then dropped down to single crochets as I came across to the purple through the center.

SANY0124

I then attached the coral yarn and chained 1 and turned.  I started putting 3 single crochets in each stitch to force the piece to ruffle.  (Note the blue and pink doubles and triples behind the pink and white puff stitches on the left hand side of the pic.)

SANY0125You can now see the coral is forcing a ruffle.  3 single crochets in each stitch across.

SANY0131And here is the completed # 11 scrumble in my Scarf.

I will show the rest of the scrumbles and the completed scarf in my next blog post.  If you have not tried Free Form Crochet or FF for short, I encourage you to try it.  It is quite fun.

I have become a member of the International Free Form Fiberarts Guild.  It is free to join.  There are plenty of wonderful people out there who will help you and encourage you to venture out into FF.  If you have any questions please message me.  If I cannot answer them I will find someone who can.

Here is a link to the Free Form Fiberarts Guild  http://groups.yahoo.com/group/FFCrochet/

Happy crocheting!!!


To follow my blog, click the purple diamond on the right hand side of the screen under the links section—–>