Welcome to Part 3 of my Free Form Scarf.
See earlier posts on this blog for Free Form Scarf Part 1 and Part 2. This is my very first Free Form Crochet piece. I have ventured out into a new to me art form in fiber arts, no patterns, just crochet; changing stitches, changing yarns and just creating as you go along. I love the textures that I am creating. Each small section is called a ‘Scrumble’ I finished it some weeks back and am just getting around to posting. Sorry, life happens and I get busy.
In Part 1, I showed my very first 3 scrumbles, the beginnings of the Scarf.
In Part 2, I showed scrumbles 4-10, and the completed scarf to that point, which was about two thirds complete.
In this post, I have decided to show the creating of scrumble # 11 in some detail. To give you an idea of how I created each scrumble and how I created this scarf, and to also give you inspiration to create your own FF piece.

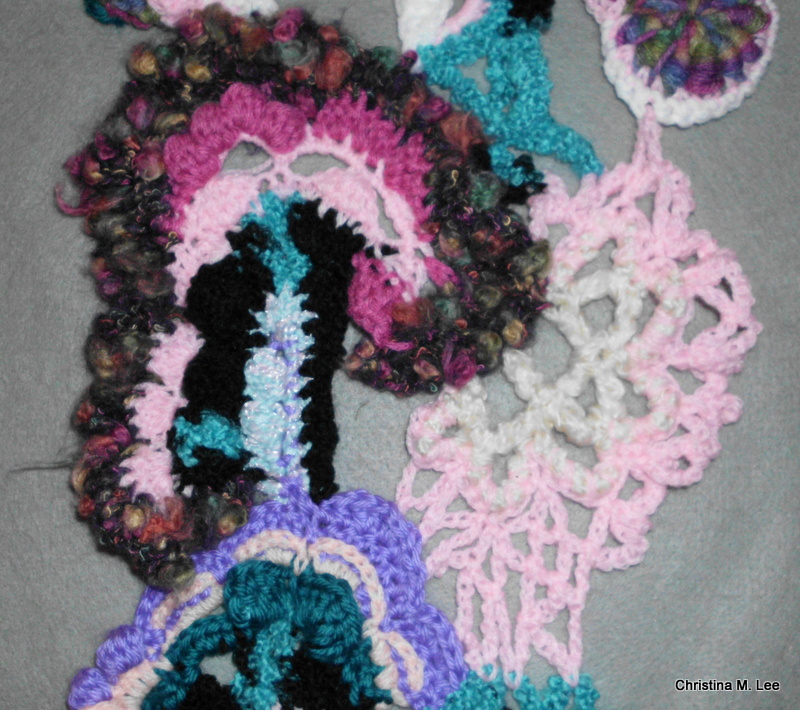
I started at the top of the 10th scrumble creating the 11th scrumble. I hooked the pink and white stripped yarn on, and single crocheted around the purple chain stitch, (pic above).
 I then started across the top of the purple with a couple of single crochets. I chained 5 stitches and skipped 4 single crochets and slip stitched in the 5th single crochet of the purple row.
 At this point I decided to turn my work. I then chained 2 and turned. I am now working on the back side. I started making puff stitches across the open chain stitch area. Puff stitches are created by making 4, 5 or 6 double crochets but not finishing the stitch and keeping the last loop of each stitch on the hook and starting the next double. You then pull one final loop through all 4, 5 or 6 loops on the hook and pull them together tight and slip stitch, forcing the yarn to puff out ward. The puffs show on the right side.

The rest of the puff stitches are complete across the open chain space. Remember this is the back side of the work, they are puffed out on the right side.
 At this point I decided to change yarn. I changed to a pretty blue and pink textured yarn. I am having so much fun. You look through the bag of scrap yarn and think, that color would be good to use next, and you go for it.
 I created some more puff stitches across the top of the single crochets from the row before with the blue and pink yarn.
 Here is a pic of the front of the work showing the puff stitches. I really love the texture of this yarn.

This pic shows the front side of both the blue and pink puff stitches and the pink and white puff stitches. Notice the different look and texture of they yarns and the difference in the puff stitches. Quite interesting effect making the same stitches with different yarns.

Next, I worked behind the pink and white twisted yarn puff stitches. Chaining 1 or 2 stitches and slip stitching between the puffs. Laying some foundation chain stitches behind the puffs to work the next row off of. I worked these behind the puffs, then at the end of the row I chained 2 and turned and started placing double crochets around my chain stitches behind the pink and white puff stitches. Now I am again working on the back side of the scrumble. (You can see the chain stitches behind the puffs I placed on the row before.)
 I continued putting some double crochet stitches, some triple crochet stitches behind the pink and white puff stitches I made on the previous row. Still working on the back side of the scrumble and working these around the 1 or 2 chain stitches I placed between the puff stitches on the back side.
 This pic shows the completed row. I came across the row with double crochets, triple crochets, then dropped down to single crochets as I came across to the purple through the center.

I then attached the coral yarn and chained 1 and turned. I started putting 3 single crochets in each stitch to force the piece to ruffle. (Note the blue and pink doubles and triples behind the pink and white puff stitches on the left hand side of the pic.)
 You can now see the coral is forcing a ruffle. 3 single crochets in each stitch across.
 And here is the completed # 11 scrumble in my Scarf.
I will show the rest of the scrumbles and the completed scarf in my next blog post. If you have not tried Free Form Crochet or FF for short, I encourage you to try it. It is quite fun.
I have become a member of the International Free Form Fiberarts Guild. It is free to join. There are plenty of wonderful people out there who will help you and encourage you to venture out into FF. If you have any questions please message me. If I cannot answer them I will find someone who can.
Happy crocheting!!!
To follow my blog, click the purple diamond on the right hand side of the screen under the links section—–>
Continuing on with my Freeform scarf made with the scrumbling technique. (See previous post for part 1) Quite interesting fibre arts, to say the least.

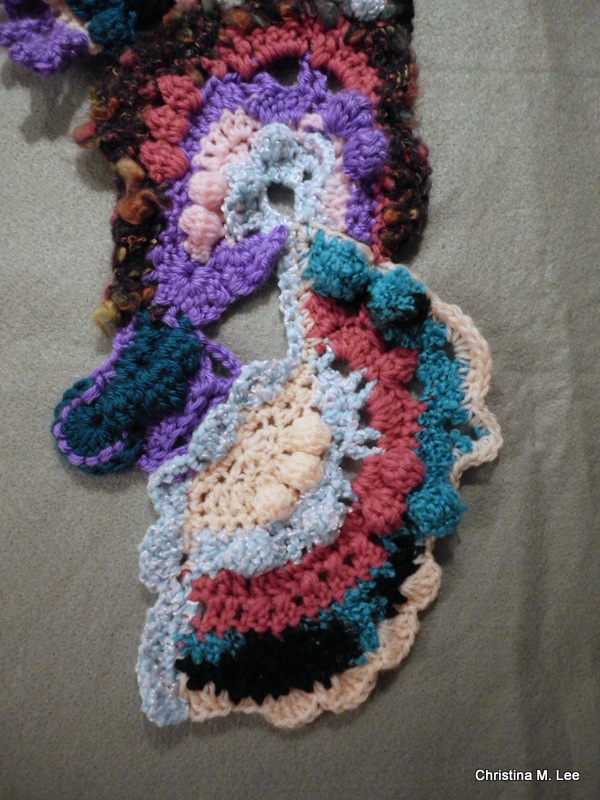
The pic above depicts my scrumbles numbers 4 and 5. (Pics of #’s 1, 2 and 3 in previous post). Number 4 is the one on the left. I attached the pink and started kind of at the center top of the previous scrumble. From there I went to the blue and black yarn, then to the left of that add the teal, then the peach and lastly the purple. Creating a half arch coming up and off of the previous scrumble containing bobbles, fans, ruffles and open spaces.
Scrumble number 5 came about as the scarf was now needing support so it would hang better. I started on the right hand side of Scrumble #3 with the pastel blue/pink/white yarn, then to a darker pink, and then the blue/back textured yarn, it contains bobbles and shell scollops. Then I left a lot of open spaces and created a ruffly effect in the blue/black yarn at the top, which is created with ch sts and sl sts. It connected to #4 at the top left, attaching it to the purple.

Scrumble number 6 is the left hand scrumble in the pic above. For #6, I again started on the left/top side with the purple and this one went straight up for a bit, then it started curving over to the left and then curved way over and back to the right. It is mostly bobbles, sc, dc, and lacy open work with chs and sc, ending with the extremely textured brown/red/tan bulky yarn, which I have fallen in love with for scrumbling.
The scrumble to the right of it is actually #8, it was made after Scrumble #7 in the pic below, and it is open and lacy and I only used 2 colors in it. It contains ch sts and sc only, then attaches to the lower and upper scrumbles with slip stitches.

Scrumble number 7 is the center top scrumble starting with the white yarn, which by the way, I have not used previously. I crocheted a ch arch with the white and worked off of that, wrapping sc and dc around the chain to create the curve with a bit of scallops in it. This one was worked up through the teal on the left and the blue/black textured yarn on the top right.
I then came in and added #8, (see pic above) the cream and pink lacy scrumble, which connected numbers 6 and 7 together on the right hand sides.
Scrumble #9 is the variegated round scrumble in the upper right hand corner of the pic above, outlined with pink yarn. This is a bullion circle stitch and the first time I have incorporated it into the scarf, and then goes up to the left with some bobbles. Below is a close up pic of Scrumble #9.

It connects numbers 7 and 8 together and allows them to hang better.

Scrumble #10 begins on the right, and contains only 2 yarns, blue/pink/white yarn and the purple yarn. It comes across the tops of #9 and #7. It is some double crochet shells which ruffle by going behind the with a short ch st and forcing them to ruffle up. I then came behind them with the purple, working dc behind the shells and 3 sc in each dc and another row of 3 sc in each sc to force the ruffly effect at the top of the purple, the purple chs it’s way across and catches the teal with a sl st, then works around the teal in sc.
Here is a pic of the whole scarf so far. It is about half done.
 I have been having so much fun creating this. I will work on it some more and create another blog post as it continues. We will see where it goes next.
To follow my blog please click on the purple diamond on the right hand side of the screen at the bottom of the links section——>
I have found a new Artform, at least new to me!! It is called “Freeform Crochet.” And is very exciting and fun!! This is definately fiber arts as I had never seen it before. You just start crocheting and keep changing yarns and stitches and see what you can create.
Working in smaller sections called “scrumbling” you can get very creative. I have started my first scarf. This is a great way to use up scrap yarn. Pick a pile of yarn scraps of colors that compliment each other. 8, 10 or 15 colors.

The pic depicts my first three scrumbles. The first scrumble (bottom of the pic) started on the left side with the peach yarn. I made a random amount of ch sts, some dc in a fan shape, and created a few bobbles. I changed to a light blue, white, pink variegated textured yarn, and continued with the fan shape, created some bobbles and some open spaces. Changed to a dark rose color, still working in the fan shape, some sc, some dc, some smaller fan clusters, filling in the open spaces left in the row before. Still continuing in the same vein, I changed to a bulky black and blue variegated yarn, adding some more bobbles, some open spaces, some fans. Then I went back to the peach around the edge and worked some sc, some dc, some scallops around and came back across the beginning edge of the scrumble with the light blue, pink, white variegated. End of first scrumble.
The second scrumble started where the first one left off, number two is the one shown in the top of the pic. As you can see I was working with the light blue, white, pink variegated textured yarn and just started the second scrumble coming out of the first scrumble. That one went on to pink, then to purple, then rose and then a real nice bulky, fuzzy yarn in roses, browns and tans.
The third scrumble is the small one to the left side of the pic. I attached the teal yarn to the second scrumble and made some chains, then made a small loop in the end of the ch from 3 ch sts and sl st them together, then some sc back down the ch and the 3rd row had some bobbles and dc back to the loop I made in the ch and I filled it with dc. Changed to the purple and made some sc, around the end of the circle I did back post sc. As I came beside the first scrumble, I made some ch sts, and sl st it to the first scrumble and more chs and sl sts. I attached it to the first one for more stability of my scarf when I wear it and as it hangs down.
I am loving this new Artform I have discovered!!! Thinking of doing a wall hanging for my dinning room wall. More blog posts to come as I create more scrumbles and the scarf comes together. Any questions, just ask. I am learning as I go and it is totally fun.
Happy hooking, as us crocheters say.
To follow this blog click on the purple diamond on the right hand side of the screen below the links section ———–>